Diesel Heater Install

Prospecting Australia

Help Support Prospecting Australia:

This site may earn a commission from merchant affiliate links, including eBay, Amazon, and others.
Thanks for the update Condor. I wish my install was as straight forward, but I have only one small place where I could mount one and not have hassles due to chassis, springs, etc, under that location. Time will tell if one can be fitted ok.

Keep up the good work.

Rob.
 
Might be time to think outside the box, Rob.

Think about an external box for the heater, then run the vents through a wall, or something like that. Also they can be mounted on their side and the air intake and exhaust then go through a vertical wall.... etc etc

Mike
 
Thanks for the feedback Mike. Time will tell, as I would prefer to not have the unit outside if it can be avoided. I am also running short on time before travels, so all may be too much to do in the time remaining.

Back to an earlier question regarding the muffler, you indicated that it was worth it, but I have seen posts on other forums indicating that it didn't make much difference, plus another saying that the air intake can make more noise than the exhaust.

Would it be worth my while looking at using a muffler, where would I source one and what do they cost?

Rob.
 
I got mine with the Erberspacher, but Pinnacle Wholesalers in Ballarat sell them, http://www.ebay.com.au/itm/DIESEL-H...58?pt=LH_DefaultDomain_15&hash=item4adaf739b6

$35

They do make a bit of difference, you can also get air intake silencers as well. Once the heater reaches temp, they slow down and the noise outside is much lower than at startup. The other thing in using a silencer, it allows you to 2 piece the exhaust pipe which may make it easier to route.
 
My van being reasonably insulated will make mine quieter than the one I had I the previous van, which had canvas ends at the beds.

The noise overnight was not enough to spoil a good nights sleep, especially when you are warm as toast.......
 
Todays job -

The task today was the combustion exhaust & intake pipe fitment. I had to go get some longer set screws, threaded rod & a couple more 'P' clips to fix them.
The air intake is fairly short and the only constraint is to point the end down & away from direction of travel. It doesn't get hot.

The exhaust however gets very hot, so I needed to keep it away from anything that would suffer, such as the wooden floor, the nylock nuts on the chassis * any plastic tubing such as covers the handbrake cable nearby.

1434174587_pipes_etc.jpg


1434174587_exhaust.jpg


Tomorrow - again weather dependent, locate the fuel pump & filter, cut the fuel lines to the correct length & install all the connectors & hose clamps.
Apart from the electric cable to the pump, which I'll detail in the posts following.
 
Before I detail the fuel system, I read on a forum last night that because there is no filter on the combustion air intake, a member of that forum had a spider infestation crawl into the combustion chamber causing the heater to fail. It cost him over $270 to get it cleaned out. Webasto in the UK have recently marketed a filter silencer for this, but at near $70 and from the UK, I decided to improvise.

So I went to Bunnings and bought these parts. The air intake pipe was just a fraction to small to go over the plastic adaptor, so I cut it about 20mm down the pipe, then used airframe tape (duct tape) to seal the cut before putting the hose clamp on. It's not an air filter, but it will keep spiders out and grass etc. If I can source an inline 25mm cartridge air filter, I'll upgrade later.

1434261303_filter_parts.jpg

THE BITS

1434261315_filter_instl.jpg

INSTALLED
 
Just got the fuel system 99% done (which is what I wanted)

1434261468_pump_to_heater.jpg

Note the continuous rise from the pump to the heater fuel line and the angle of the pump. The fuel line has split conduit around it in all exposed areas to past the filter, where it then is inside 12mm clear plastic tube.

1434261478_filter_n_pump.jpg

The fitting marked ** is not tight for a reason and will be disconnected as follows. Once I've got to the point of fuelling and commissioning the heater, I have an oil syringe which I will tape to the end of the rubber joiner, I'll then use it to suck diesel through the line and filter so that the pump is almost primed. The pump does not like sucking air. The 2 Panduit straps either side of the filter are temporary, I'll be using saddle or P clip clamps to better fix this area.

I'd just cleared the tools and bits and pieces under the van when it started to rain, so lucky I got done what I did.

Next job - position the controller inside and wire all the harness up. Also drill a hole in the floor to feed the pump wiring through from the main harness to the pump.
 
Yup, tomorrow -

Position the control and run the electrics, we have a few days of rain forecast, so looks like I got the outside jobs done just in time.

1434283763_106746.jpg


This is the syringe I'm going to use to draw fuel thru to the pump. A few turns of insulation tape to air seal. The last time I did this, it took 3 to 4 goes, so it's withdraw the plunger, untape, return the plunger then retape every time.
 
Got the 12V power run to the heater finished. Also, the controller is installed and that cable also run to the heater. Unfortunately have yet to do the fuel pump wiring, too much rain to get under the van, so ASAP again weather depending. So pics will posted on completion.

What's left - I need to put at least 2 P clips on the fuel line under the van, the pump electric cable under the van and into the heater compartment and then get some fuel into the tank and suck it through to the pump. Then its time to push the button and see if it works.

Once done, I intend to put a bulkhead and lid around the heater to separate it from what is stored under the bed. Looking at using alum angle from Bunnings and maybe pegboard to allow some venting around the heater.
 
Today's jobs -

Fit 2 cable clamps to the fuel line and remove temporary Panduit straps.
1434432842_pump.jpg


Drill hole through floor for pump cable and fix.
1434432879_pump_cable.jpg


Cables routing and tidy up, to fix inside under bed. All cables are tied to each other or cable clamped to the bed, I ran he 2 main leads high, so that the chairs and satellite dish among other things doesn't damage the cables.
1434433009_cable_run.jpg

1434433009_cables.jpg


Both the pump cable and the control cable are lengthy, however they come with the connectors pre fitted to each end and are not to be cut or shortened (unless you can source the correct or replacement connectors to re terminate the cable. The easiest solution is find a spare spot, coil them up and fix out of the way as I have.
1434433157_excess-fuses.jpg


Next was a trip to the servo for some diesel and put some in the tank. I did not have to suck the fuel through as the tank head level was enough to run the fuel down through the filter to the pump. I tightened the hose clamp I'd left loose to remove the line.

Next - Although the heater has its own fuses, I have included another near the battery, as my power cable run is a bit over 5M long. So, fuse put in place, button pressed and hey presto, a working heater.
1434433436_control.jpg


Next
 
Next job to complete the install -

Using alum angle, screwed to floor and inside wall of bed, 6mm marine ply screwed to it, I'm going to create a bulkhead to separate the rest of the under bed storage from the heater. Also a hinged lid to allow heater access and offer some heat insulation to the bedding above.

I've already worked out the material and how to do this, so, a trip to Bunnings is in order tomorrow.
 
The heater is now in it's own compartment, under the bed, fully operational and the job is complete.

There will be no more posts on this thread by me, unless someone has questions further down the track..

Thanks
 
Only thing you have missed mate is,
How well does it work. LOL
Nice post as well.
Thank You. :D
 
But surely you should fire it up now....
See if there are any issues at home, rather than be out bush....and it don't work??

Fire it up!!!!

Let us know!!!!
 
I've fired it up 3 times, I did say, a couple of posts ago, that it was fully operational. That kinda suggests I have tried it, lol.

I'll put the figures up after my next trip 4x4ing, but for now.....

When first started it pulls about 10A when the glo pin is on, that's only for 3 or so minutes. The blower fan ramps up like a jet turbine to raise the temp in the van and seems to pull about 2.8A. How long this goes for depends on the ambient temp, the temp in the van and the temp I set the heater to go to. I'll post actual data when I go out in a month or so. The van battery will be in actual conditions not in my driveway.

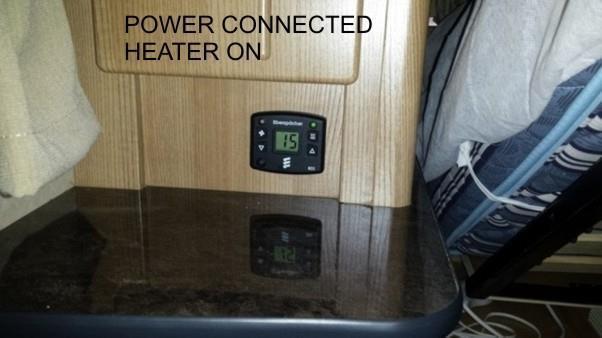
Tonight the ambient inside the van was 11 deg, (it was colder outside) I set the heater to 17 deg and it took about 30min to get there. Once at temp the fan slows down to a low hum to maintain temp. At this point it pulls 0.8A

So for now I guestimate that if I switch on at 7pm and turn off at 8am (13 hours) A 1 hour start up using 3A, I will use roughly 12-13AH overnight and about 1.5 to 1.7 litres of diesel.

My LED lighting (what I use I rate at 1.5A per hour average) from say 6pm to midnight will use 9AH. Plus the TV @ 2.8A for 4 hours = 11.2A

TV and light use is maximum and more often less, so my total above in 24hrs is about 33AH. I have a 120AH AGM so I'm on track to maximise battery life @ 25% use of capacity.

I'll see how close I get when away, I will be off power and only using solar and or my car to charge.

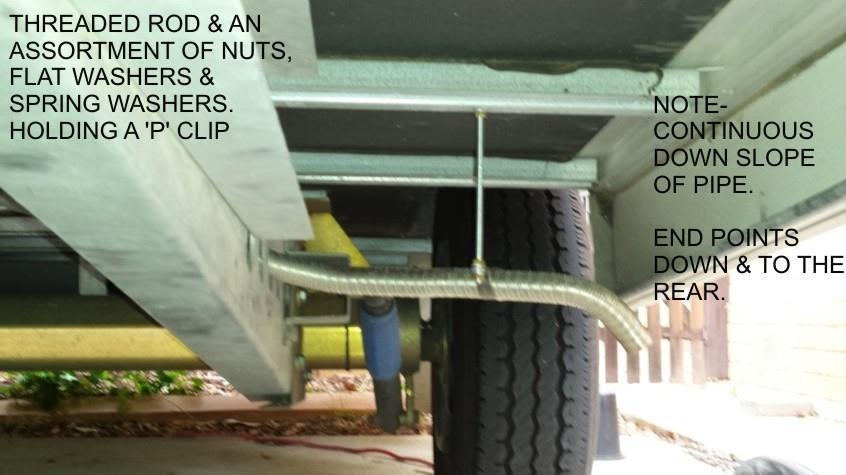
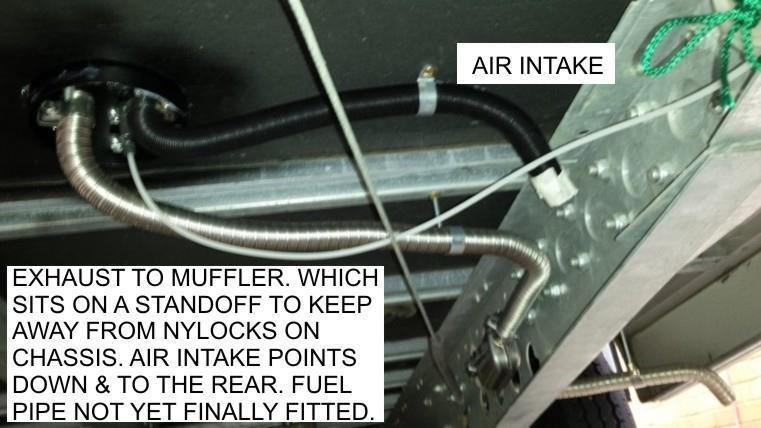
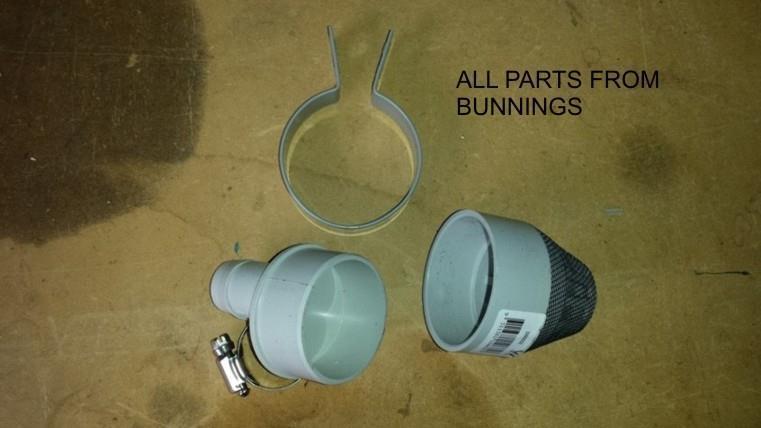
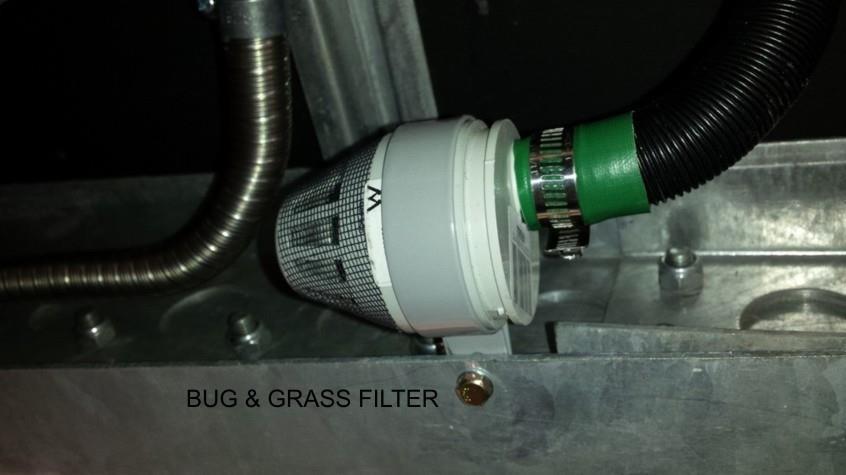
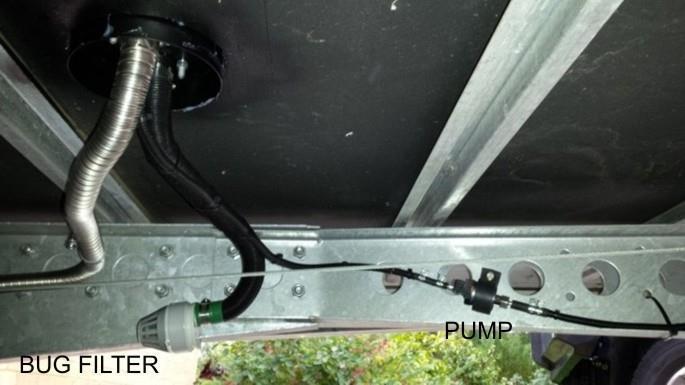
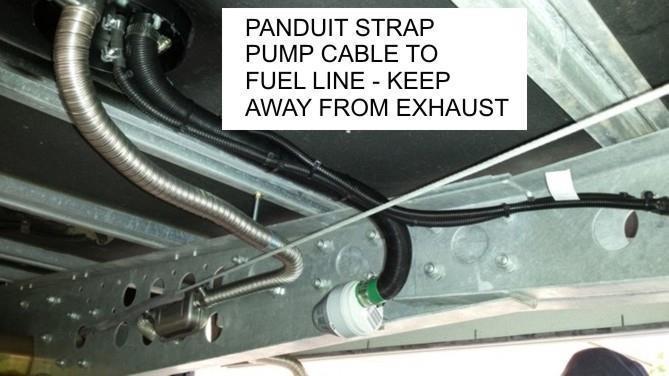
And, yes I have checked for leaks, but I've noticed when on high the combustion air intake seems to whistle. This maybe the improvised bug filter, but once the heater slows down, it disappears.
 

Latest posts

Top