Slide on

Prospecting Australia

Help Support Prospecting Australia:

This site may earn a commission from merchant affiliate links, including eBay, Amazon, and others.
Joined
Oct 18, 2014
Messages
39
Reaction score
55
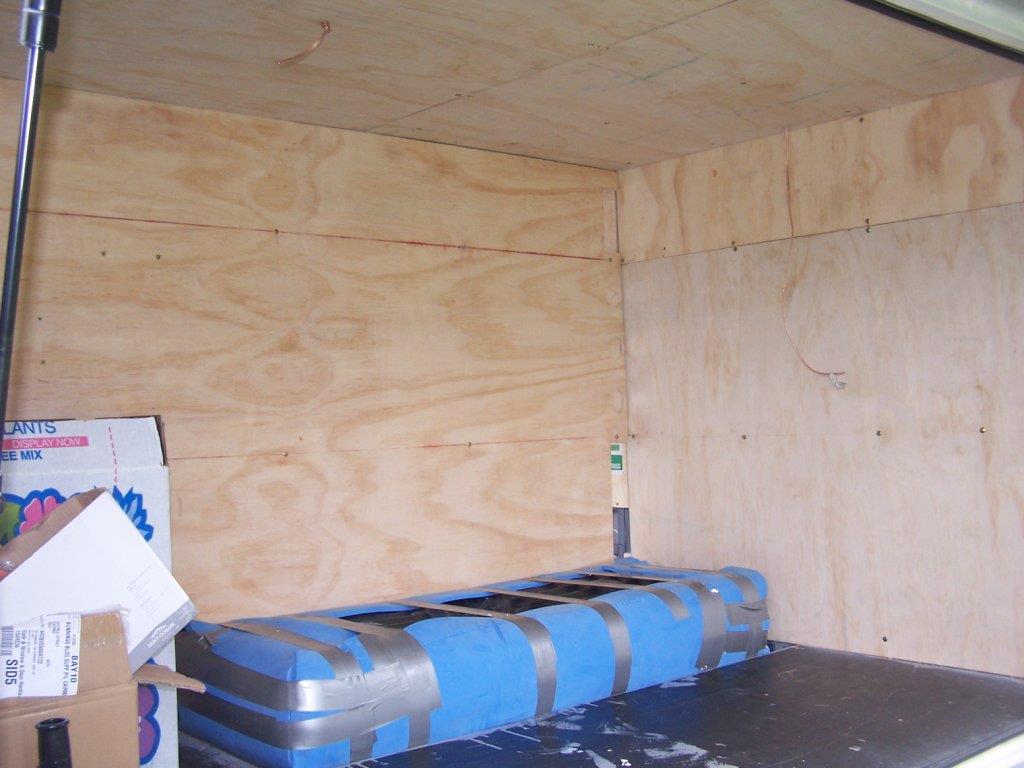
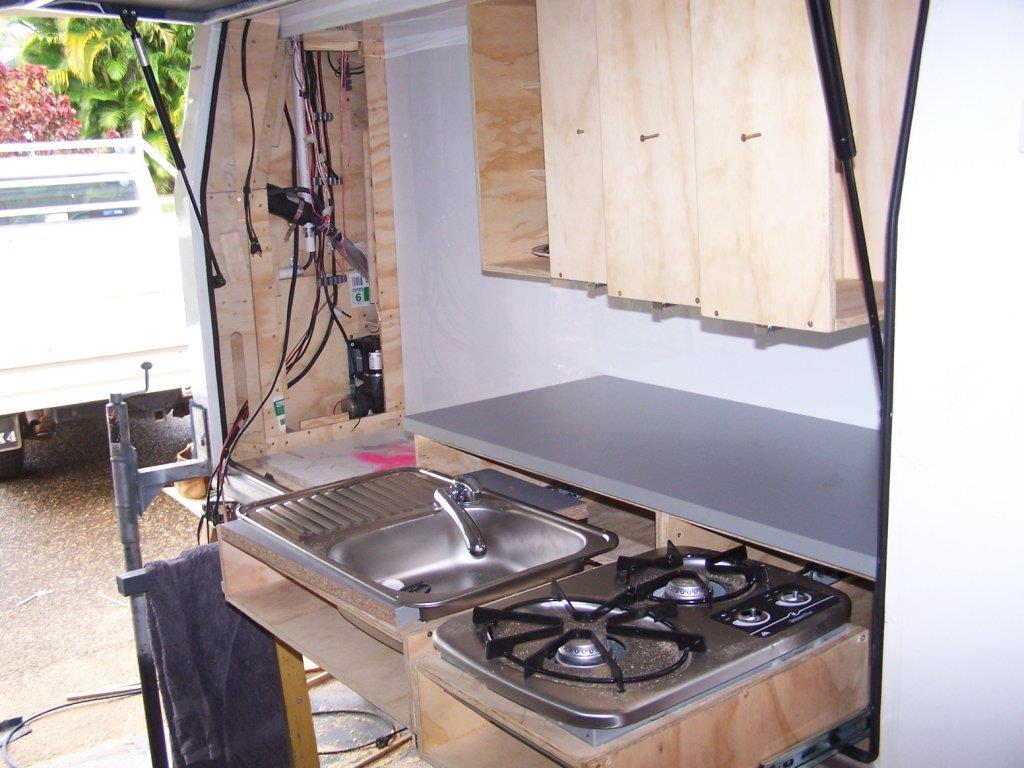
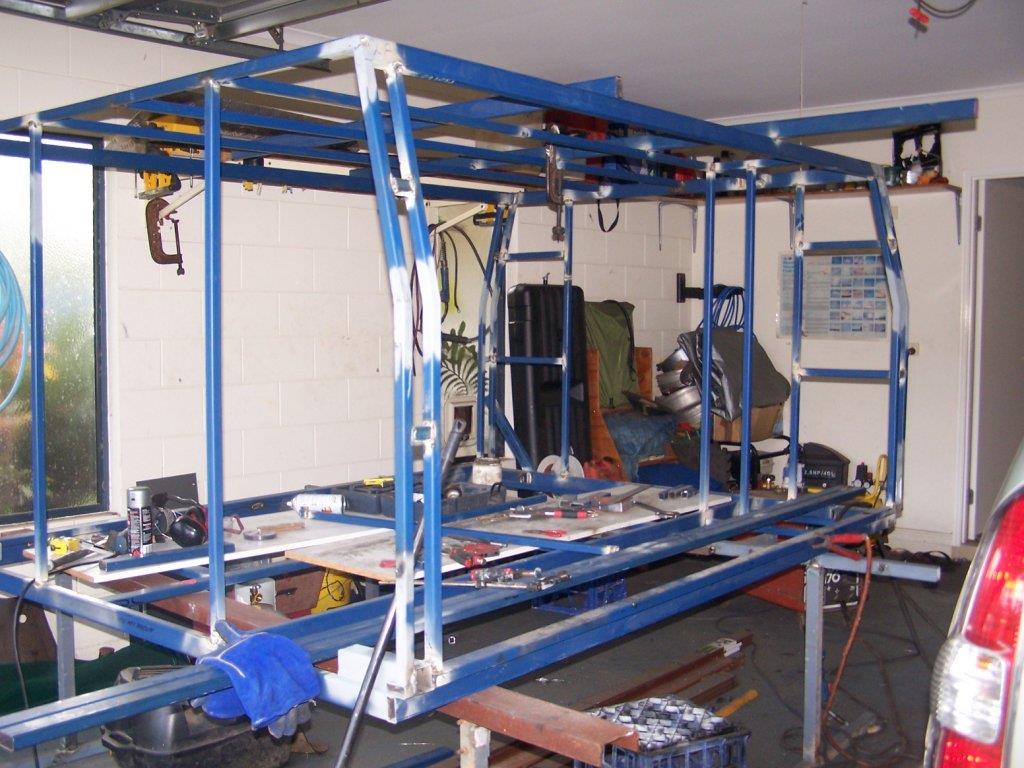
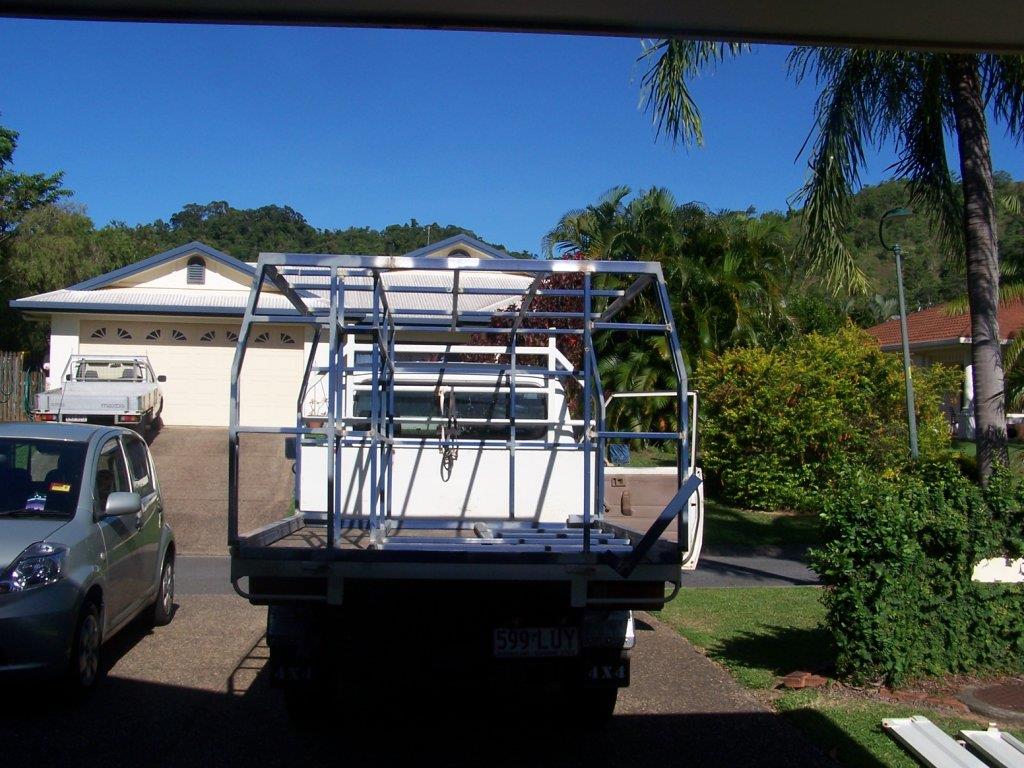
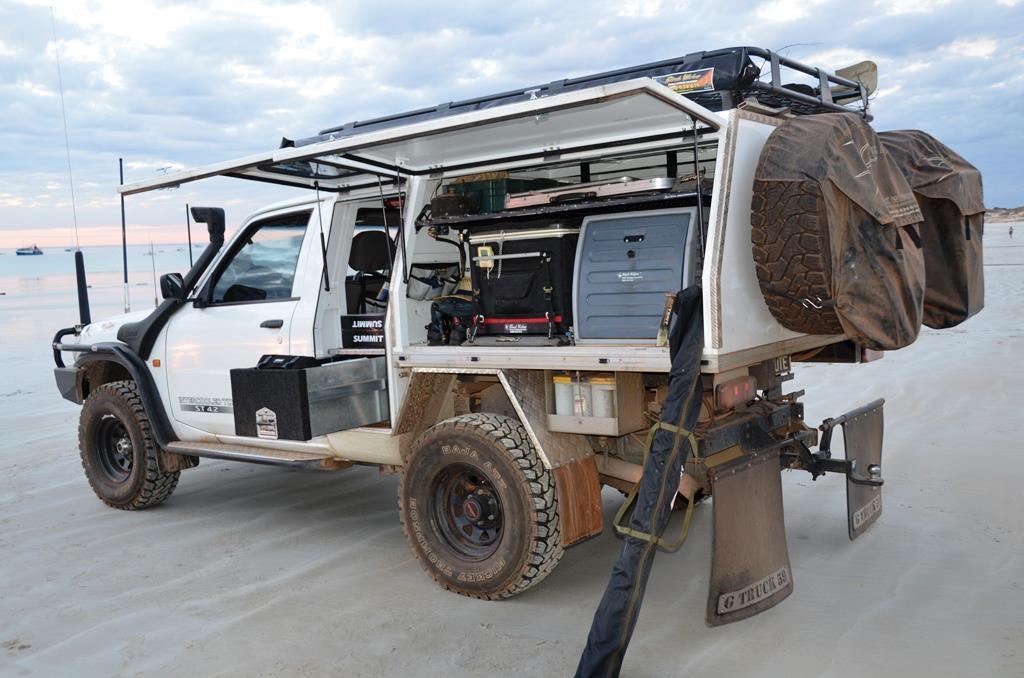
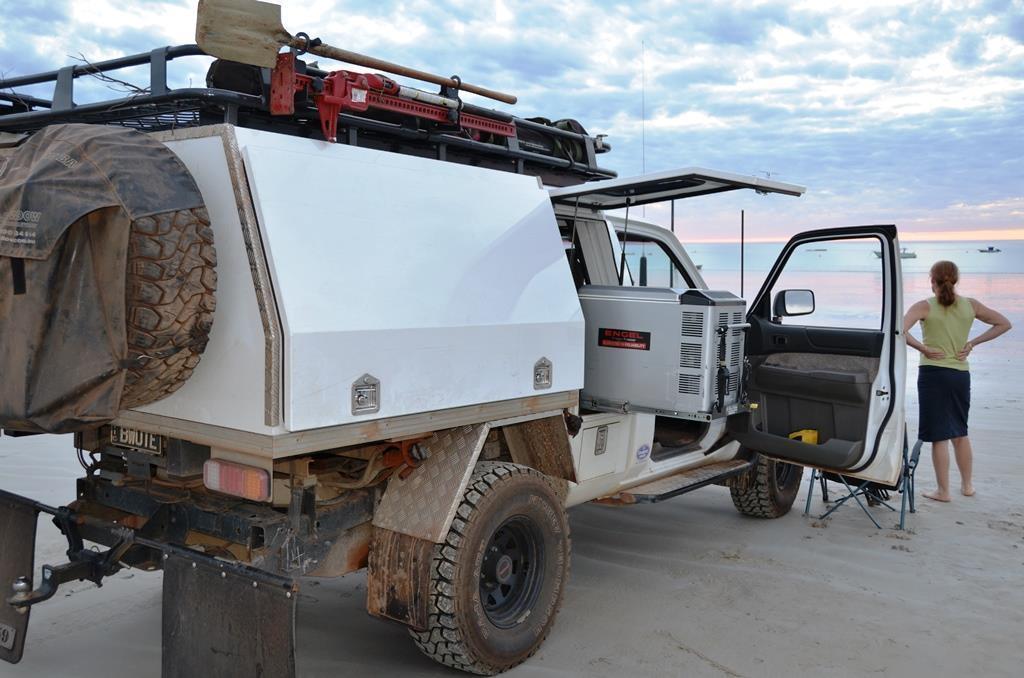
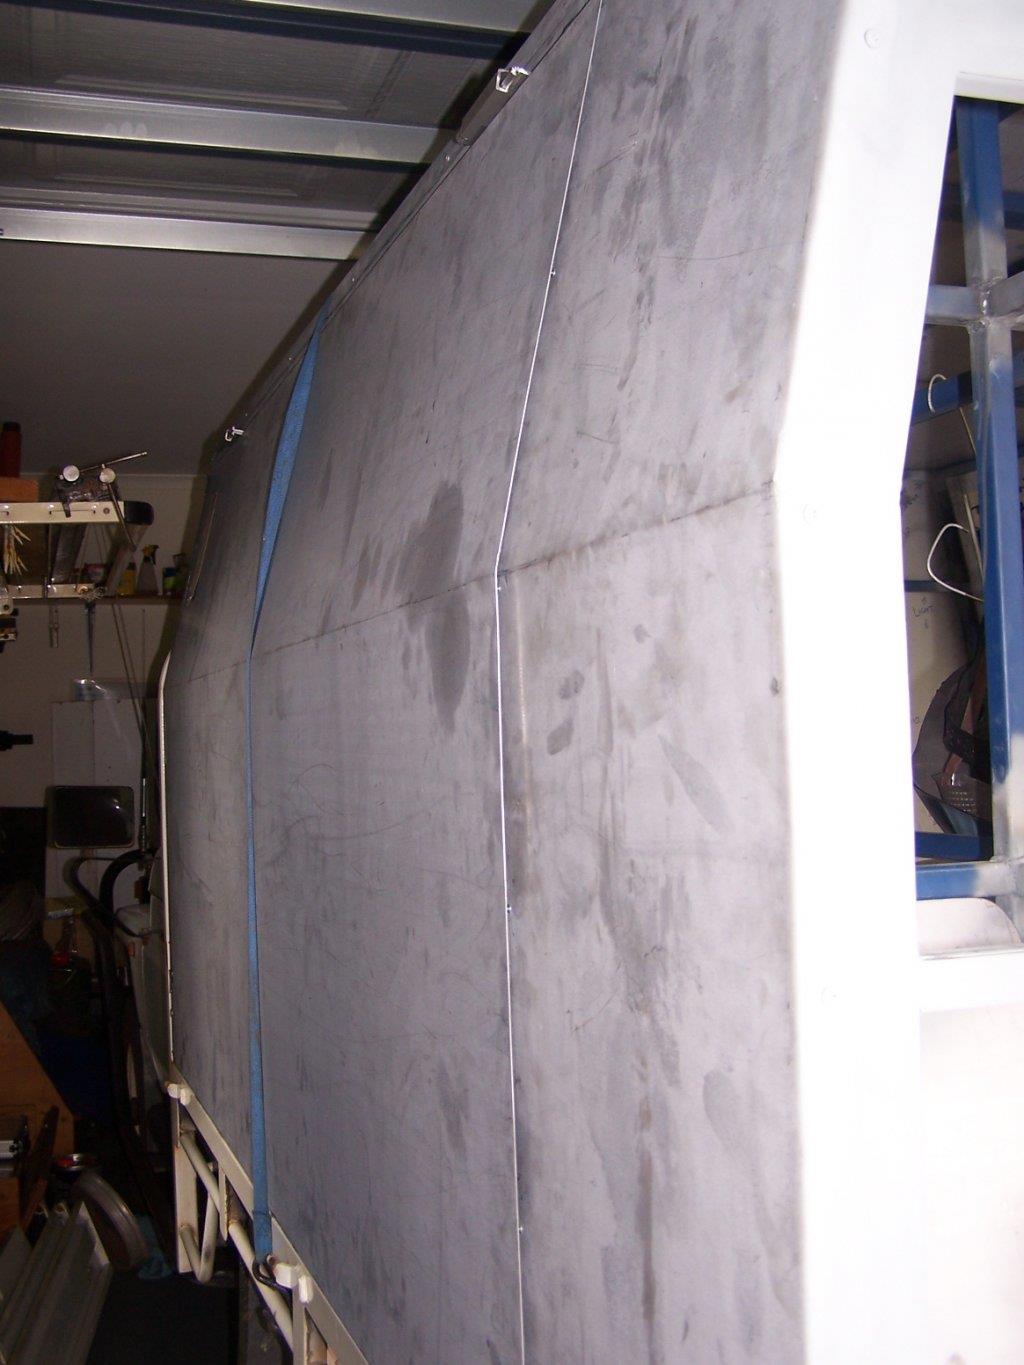
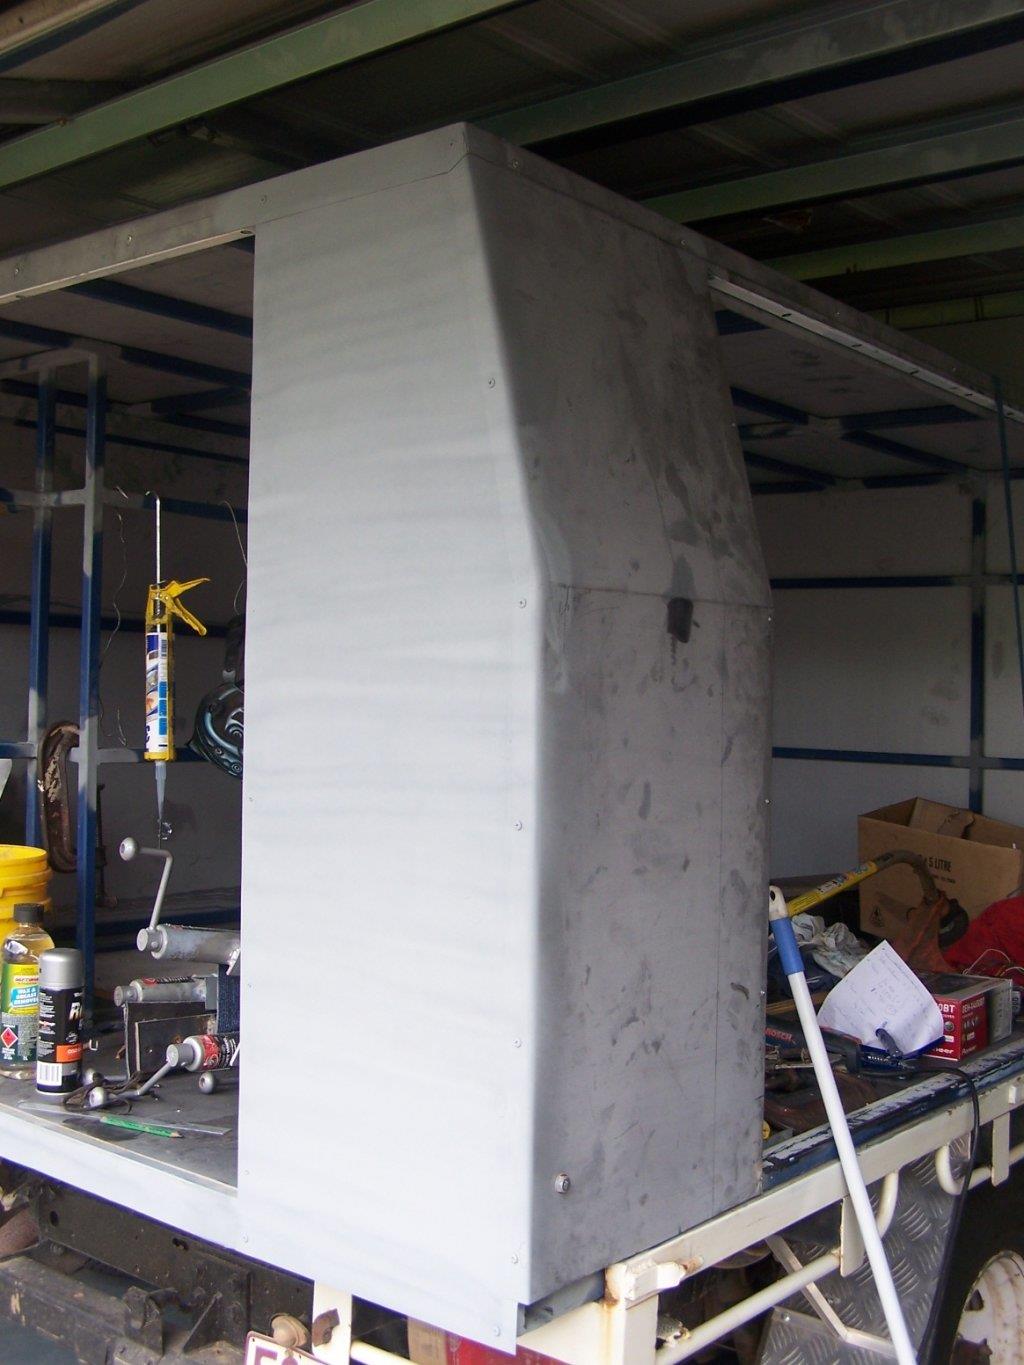
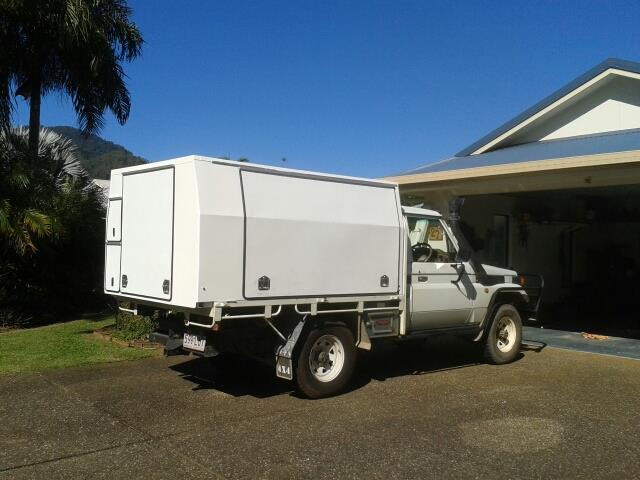
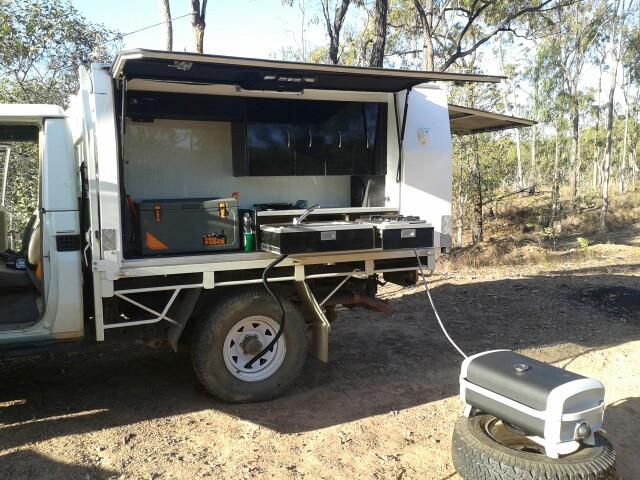
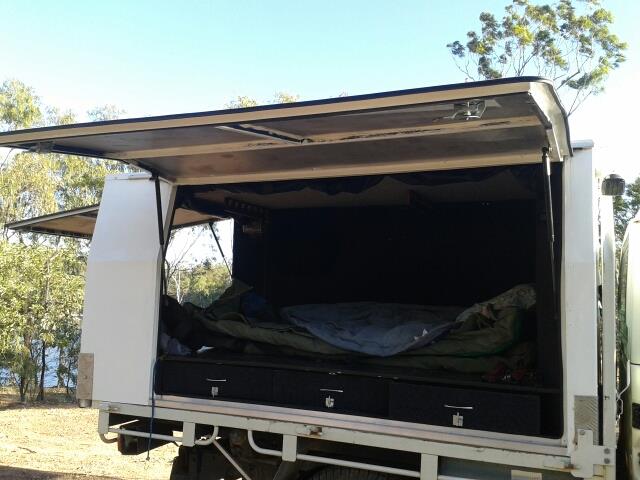
A few pics of the slide on camper that I have recently completed(or near completed). I have an Aussie Swag extreme off road trailer(soon to be up for sale) and although it is great, with only me to cater for now a change to a more easier camp was in store.
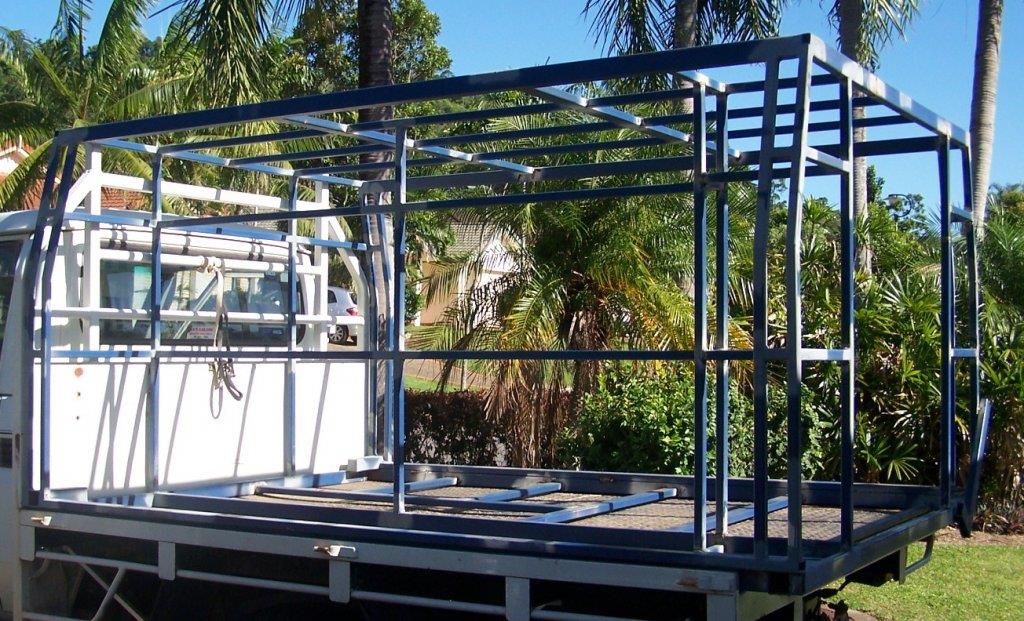
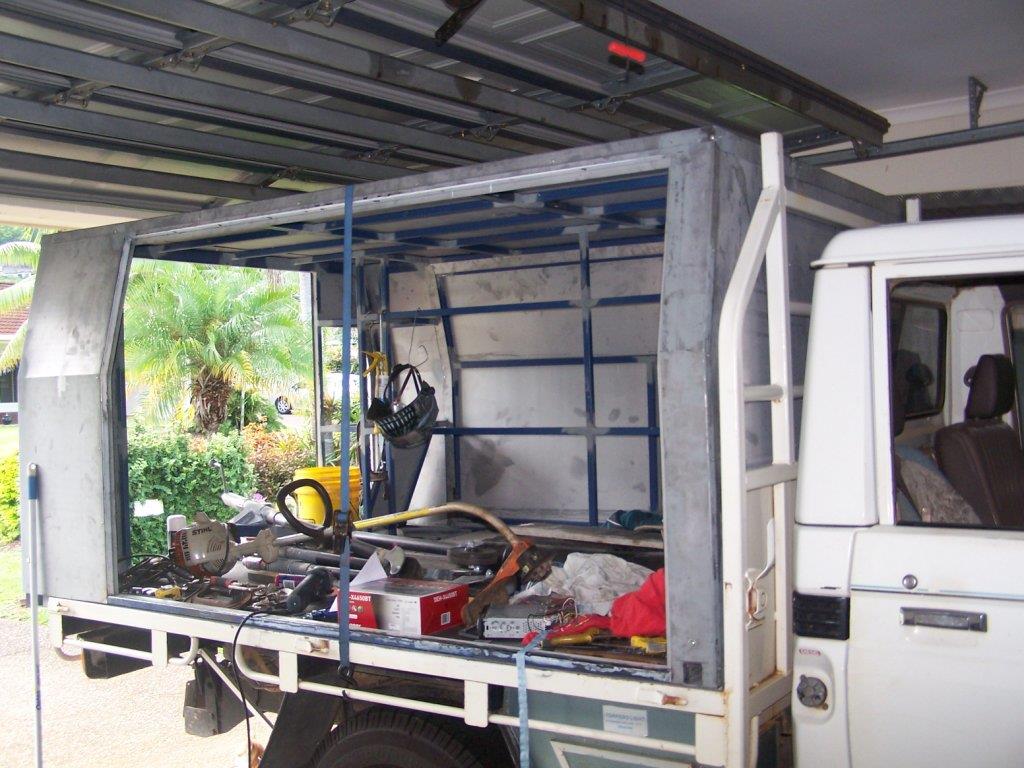
I built this with just basic welding experience and knowledge, but did spend a lot of time planning and experimenting with each stage. Anyway for those out there that want to tackle something similar, I have lots of tips, heaps of progress pics and ways to avoid the mistakes I made along the way.
Be patient tho as I am shift work who works away and sometimes it may take a few days for me to reply
Colby
1414010922_2014-04-30_09.34.50.jpg
1414010977_2014-10-10_17.00.05.jpg
1414010998_2014-10-10_17.00.31.jpg
 
G'day Colby, great job. I'm in the process of doing some thing similar the only problem is when I just about get it finished I think of or see something else that should be added. They seem to be a never ending project. The next job is to get the tray off and install a under tray drawer and water tank. It looks like yours is fully screened as well. Good to see you've got the bbq. Should be many a happy and comfortable prospecting trips with that setup.
:) Mick
 
1414015932_canopy_023.jpg
Gidday Mick
Thx for the reply. I left my tray on as I had to use it on a day to day basis to bring home the gear that was required to build the camper,
I built the water tank under the "bedroom" floor behind the drawers, again for the portability factor. That pic of the BBQ was on the shake down trip and I had forgotten the table to put it in! I am not happy with the pull out cooker and sink, and will be changing them to a swing out system. :( The midge screens are velcroed onto the carpet lining and works a treat. :)
The master plan was to sell the camper trailer, buy a quad bike for detecting, with a fridge thrown in from the trailer sale as you can see the esky was filling in. I am thinking of buying a 50litre Weaco fridge freezer( the space where the esky is sitting is designed for the fridge). Any comments on the Weaco fridges? The reason I chose these one is the power consumption supposedly around 0.7amp/hour
1414015995_canopy_067.jpg
 
1414307896_hhghgsdvf_002.jpg


From the start.
The frame. At this point I worked off the actual size of my ute tray. I had drawn up by hand the layout what I thought would be practical for me and measured and cut to suit. This included drawers under the bed but not the kitchen. After studying the "net" and consulting with some mates, Weaco was the choice (unless someone can come up with another option). Engels are excellent fridges but in my view are too over priced for what you get.An Atwood 2 burner cooker was the choice because of the size that suited the kitchen. In hind sight another 200mm added onto the depth of the kitchen would have given me better and more options for the fridge and cooker without compromising the sleeping side. Having real problem uploading pics. :mad:

More to come
 
I have a CF60 runs awesome have had it since they were first released
And my parents have got aCF60 and a CF50 and we're living out of them full time for about 3 years
So yeah I rate them 5 STARS
 
thx for that Mudguts, that's encouraging. Apparently the Cfx range are the latest updated version and are getting good reviews also.
 
Hi Colby

I have the CFX50 purchased S/H and so far I have had no problems with it. I can get about 2 days power from a 100mah battery with no charging going on. Did it as a static test controlled environment so could be a little out. The room is awesome. The little top plaatic shelf is perfect for cans and keeps them just under icy cold. I find -8 to -10 is a sweet spot for running and efficiency. Still keeps everything frozen as well. They key to these units is keep them relatively full. This helps keep cool. If you only have a few items in there the fridge works harder to keep cool.

I always freeze food before I go and then load up. The fridge is being used as a back up freezer, drinks in my shed and has been going non stop for the last 6 weeks no issues. I can't compare to any others as I have not had any, but I would recommend these based on my use so far.

The one thing I wasn't aware of at the time is the new CFX fridges have the Waeco compressor in them, where as the old ones used the Danfos compressor. Time will tell if this is a good move or not. I believe the CFX are more efficient than the CF range ?

Found this pdf that gives a comparison, may be worth a read - http://www.waeco.com.au/documents/n308_fridgecomparo.pdf
I just glanced over and seemed some good general details. Waeco came runner up to the ARB fridge ?

Also awesome job on the lift off rig, my mate is starting to design his, so I have shared your post with him for ideas.

Cheers
 
My Engel MT45 with the Sawafugi swing motor is great on power, running with a 160 Solar Panel it keeps the batt charged thru the day and the lighting at night. If needed run the car or genny for a while--what more do you want. :eek:
 
Good feed back every one.
My camper has a 170w solar panel permanently mounted on the roof and as my 6x3 gazebo fits perfectly over the top of the whole unit, therefore shading the panel, I am thinking of a 120w portable back up panel for the longer stays in the bush. I also have provision for 240v inlet off a gen set if needed and it is also coupled to the vehicle alternator when I'm mobile

The Cfx dz(Dual zone) fridges chews a bit more power putting them out of contention for my week long plus bush stays and Blind _Freddie had also told me the secret to any bush fridge was to keep them full or the power consumption is horrendous, so backing up what you said Westaus. Incidentally on my camper trailer I ran a 70l Chest cold 3 way, but I used it exclusively on gas except for an initial knock down on 240v before I went bush and, personally I would not go past these units as the 9kg cylinder lasted 35 days on 0 degrees without worrying about power consumption.Can't do this in the camper tho as I might gas myself!!
 
1414448080_hhghgsdvf_008.jpg
I always wanted to run a second battery and to carry gas for cooking so I framed out a compartment for each at the rear (Passengers side). In hind site I would have been better to allow the width of the fridge plus 200mm and built a compartment crossways full width in the front of the camper. Westaus mention that to your mate for his design. This would have been a great area to store the spare tyre, battery, water pump etc. The fridge would have then been able to be on a standard drop down slide. With the design I have now my spare has to be mounted on top or slung off the back . I reinforced with heavy 5mm plate to allow for a tyre mount on the right side at the rear . This may change even now as I have seen different systems that swing up from under the frame.
I did not pay special attention to the door lintels(the frame along the top of the door) and this came back to bite me in the butt later on. :8 I should have ensured that these lintels were dead straight (to the millimeter) as I had a 4mm sag and had the opportunity to fix it then.Tell you all about later.
To get a "sitting up" height in the bed side I sat my Mrs down on a chair and simply measured from her bum to the top of her head and added 150mm.Lol :lol:
I scored a 82liter water tank through a promo for $56 (normally$150) from a well known outdoor camping store and framed out a recess in the middle front for weight distribution.The tank can be seen leaning up against the wall in the pic of the frame in the previous post.

More to come
 
what does it weigh, looks pretty heavy made from steel and ply. should do the job for you. ive made a few of these over the years just sold my 79 and about the cut and extend a 200 and start all over. we must all be mad!! :)
 
these are pics of an earlier GU cab chassis we cut and shut and built a slide on back for. Put a gull wing on the cab and cut the cab wall out (rear) great for reaching that beer on the road !!! All made from aluminium.

1414458958_gu_cab_chassis_cut.jpg

1414458989_gu_cab_chassis_cut2.jpg
 
Lol on that last comment Jaros, true tho!

Yes it is heavier than the ali ones, about 478Kg's, I cant weld ali so I was forced into using steel.A set of airbags fixed up the slight sag in the rear end.(the ute, not me) Like the set up tho, that compartment in the front for the essential items is what I was talking about before. that looks like a go any where rig. Makes me jealous :p
 
1414661243_hhghgsdvf_004.jpg

This pic here shows the basic frame work finished with floor struts in and the two cabinet frames for the battery and gas(passengers side) and door openings in.Where the temp brace is welded on at the back is where I later filled in the whole square with 5mm plate and fully welded and braced for the spare wheel bracket. At this time I should have double framed the top of the door opening to ensure it was dead straight and unable to sag.

More to come
 
1415161579_hhghgsdvf_062.jpg
Once I was happy with the framing the next challenge was the skin. I chose 0.95 Zincalume for the weathering qualities and weight. This sheeting was also the main bracing for the frame as anyone knows, sheets fixed at more than four points to a frame provides strength and bracing.
I built my own sheet metal bender out of 100mmx50mmx5mm "c" section for the 2 main frames and 5mm angle for hold down clamp. I had to reinforce the clamp as it tended to flex slightly giving rounded bends in the centre of the sheet. Any complex bends I (the roof) I paid a local sheet metal shop to fabricate.
One thing I purchased that made a huge difference was a set of air nibblers. I could set up a straight edge and cut along it for the perfect cut.
All sheets were screwed on with self cutting screws mainly to keep it weatherproof. Blind Rivets can be used I guess if wanted.
A very important tip my neighbor gave me was to apply a generous strip of silicon rubber at ALL points of contact on the frame to prevent metal on metal rattle especially on rough roads. One small back sheet I tried to tack weld onto the frame and apart from distortion spots(which stood out like dogs.......?/1!! it rattled like hell even when driven out of the garage!!! Hence the screws. The much more expensive automotive adhesive(Sika product in a black tube, $30) could also be used if wanted but I used about 20 tubes of silicon on the whole project, so the maths speak for themselves. The only area I used this Sika stuff was for the Solar Panel at a later date.
All weather laps were 75mm wide, siliconed and screwed at 150mm centers. I used water immediately after joining to clean up the silicon and GP thinners after that to remove all residue. This is important where the panels are to be painted later on.
More to come
1415161613_hhghgsdvf_065.jpg
1415161657_hhghgsdvf_063.jpg
 
Not sure if it would have worked, but would something like insertion rubber between the frame and skin act as a barrier to stops rattles (argg rattles) instead of silicone. It would also be easier to get off for any future repairs or mods ? You can get strips cut to size so easy to apply ? Not sure just curious if anyone has done similar or considered it or would it wear to quickly ?

http://www.indrub.com.au/natural-rubber-insertion-strip.html
 

Latest posts

Top